Introduction
Migrating from the deprecated MongoDB Atlas Device Sync to PowerSync allows you to benefit from efficient data synchronization using open and proven technologies. Users get always-available, instantly-responsive offline-first apps that also stream data updates in real-time when online.Why PowerSync?
PowerSync’s history goes as far back as 2009, when the original version of the sync engine was developed as part of an app development platform used by some of the world’s largest industrial companies to power offline-capable apps deployed in harsh environments. PowerSync was spun off as a standalone product in 2023, and gives engineering teams a proven, open and robust sync engine with a familiar server-client architecture. PowerSync’s MongoDB connector has been developed in collaboration with MongoDB to provide an easy setup process. It reached General Availability (GA) status with its V1 release and is fully supported for production use. Multiple MongoDB customers currently use PowerSync in production environments. The server-side PowerSync Service connects to MongoDB and pre-processes and pre-indexes data to be efficiently synced to users based on defined Sync Streams (or legacy Sync Rules). Client applications embedding the PowerSync Client SDK connect to the PowerSync Service to sync only a relevant subset of data to each user, based on the Sync Streams (or legacy Sync Rules). Incremental updates in MongoDB are synced to clients in real-time. Client applications get a SQLite database that they can read from and write to. PowerSync provides for bi-directional syncing so that mutations in the client-side SQLite database are automatically synced back to the source MongoDB database. If users are offline or have patchy connectivity, PowerSync automatically manages network failures and retries. By introducing PowerSync as a sync engine, you get:- Predictable sync behavior that syncs relevant data to each user.
- Instantly responsive user experience as the app works with a zero-latency SQLite database.
- Consistency guarantees ensuring consistent state of the client-side SQLite database.
- Real-time multi-user applications as data updates are streamed to connected clients in real-time.
- Offline-first capabilities enabling apps to continue to work regardless of network conditions.
- Ask AI (see lower right corner of this site), which is trained on all our documentation, repositories and Discord discussions.
- Set up a call with us.
- Ask us anything on our Discord server.
- Contact us through email.
Architecture: Before and After
If you have MongoDB Atlas Device Sync deployed today, at a high level your architecture will look something like this: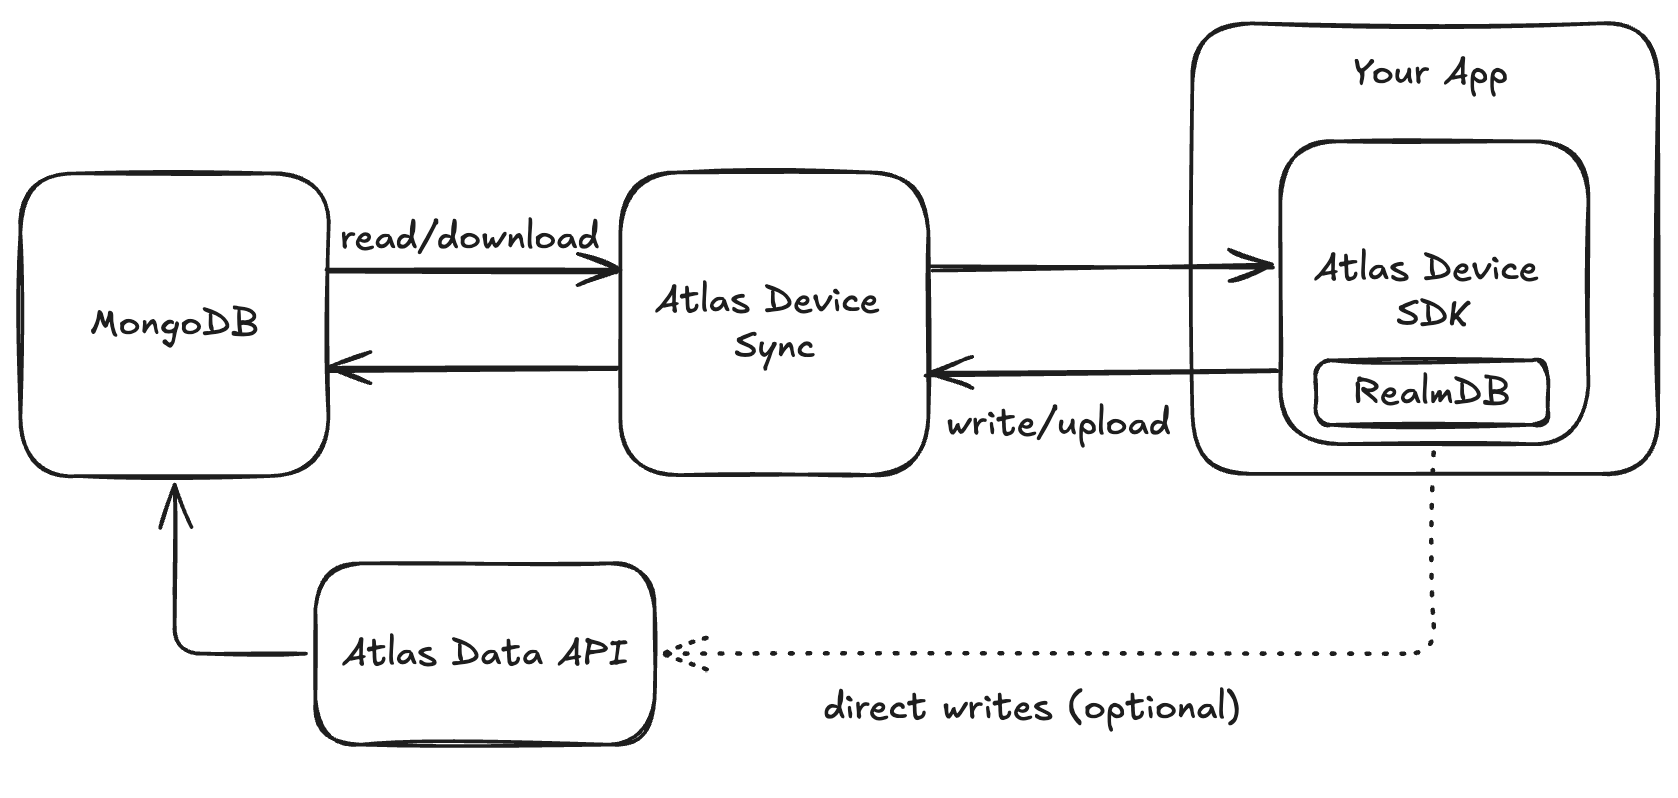
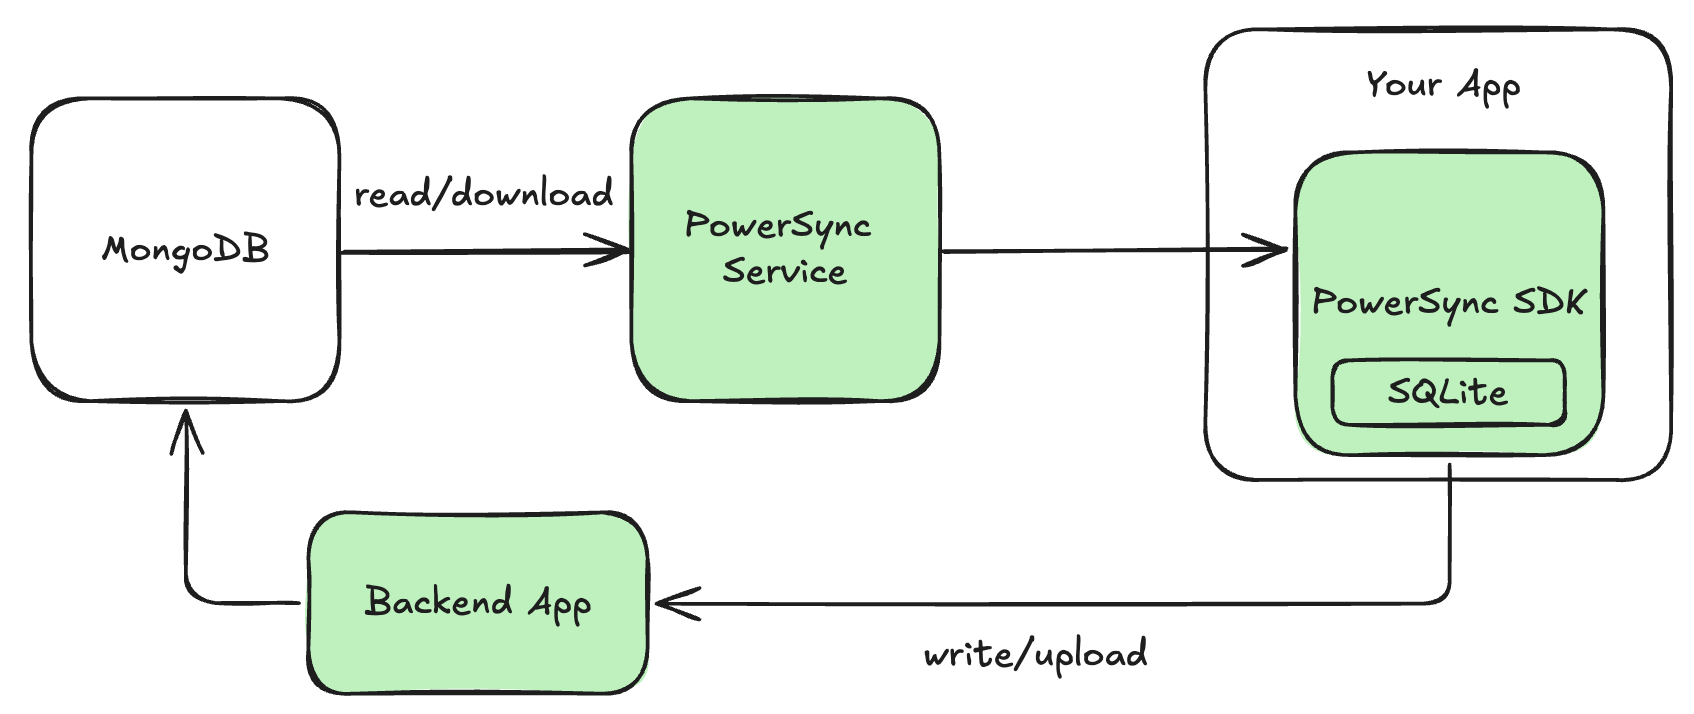
- The PowerSync Service is the server-side component of PowerSync. It’s available as a cloud-hosted service (PowerSync Cloud), or you can self-host using our Open Edition.
- Authentication: PowerSync piggybacks off your app’s existing authentication, and JWTs are used to authenticate between clients and the PowerSync Service. If you are using Atlas Device SDKs for authentication, you will need to implement an authentication provider.
- PowerSync Client SDKs use SQLite under the hood. Even though MongoDB is a “NoSQL” document database, PowerSync’s use of SQLite works well with MongoDB, since the PowerSync protocol is schemaless (it syncs schemaless JSON data) and we dynamically apply a client-side schema to the data in SQLite using SQLite views. Client-side queries can be written in SQL or you can make use of an ORM (we provide a few ORM integrations). Working with embedded documents and arrays from MongoDB is easy with SQLite due to its JSON support.
- Reads vs Writes: PowerSync handles syncing of reads differently from writes (mutations)
- Reads: The PowerSync Service connects to your MongoDB database for real-time replication of data, and syncs data to clients based on Sync Streams (or legacy Sync Rules). Sync Streams/Rules are more flexible than MongoDB Realm Flexible Sync, but are defined on the server-side, not on the client-side.
- Writes: The client-side application can perform writes (mutations) directly on the SQLite database. The PowerSync Client SDK automatically places those mutations into an upload queue and invokes an
uploadData()function (defined by you) as needed to upload those mutations sequentially to your backend application.
- Authorization: Authorization is controlled separately for reads vs. writes.
- Reads: The Sync Streams (or legacy Sync Rules) control which users can access which data.
- Writes: Your backend application controls authorization for how users can modify data, when it receives uploaded mutations from clients.
- Backend Application: PowerSync requires a backend API interface to upload mutations to MongoDB (and optionally for custom authentication too). There are currently two options:
- “Bring your own backend”: If you already have a backend application as part of your stack, you should use your existing backend. If you don’t yet have one, but would like to run your own backend, we have example implementations available. See the instructions below for more details.
- Serverless cloud functions (hosted/managed): An alternative option is to use CloudCode, a serverless cloud functions environment provided by PowerSync. We have a template available that you can use as a turnkey starting point. Details are explained below.
Migration Steps
Follow the steps below to migrate a MongoDB Atlas Device Sync app to PowerSync.It is not necessary to remove Realm in order to install PowerSync. It is possible to initially run Realm and PowerSync in parallel, and remove Realm once PowerSync has been set up.
1. Follow the PowerSync Setup Guide
Follow the steps for MongoDB and your client platform/framework in our standard Setup Guide:- Configure Your Source Database
- Set Up PowerSync Service Instance
- Connect PowerSync To Your Source Database (MongoDB)
- Define Sync Streams or Sync Rules
- Generate a Development Token
- Test Sync with the Sync Diagnostics Client
- Use the Client SDK
2. Accept Uploads on the Backend
MongoDB Atlas Device Sync provides built-in writes/uploads to the MongoDB database. PowerSync offers full customizability regarding how writes (mutations) are applied to the source MongoDB database, via your own application backend. This gives you control to apply your own business logic, data validations, authorization and conflict resolution logic. There are two options:- “Bring your own backend”: If you already have a backend application as part of your stack, you should use your existing backend. This can be any kind of backend environment including a custom backend (e.g. Node.js, Rails, Laravel, Django, ASP.NET), an API platform (e.g. Hasura), some kind of serverless cloud functions (e.g. Azure Functions, AWS Lambda, Google Cloud Functions, Cloudflare Workers, etc.), or any other equivalent system that allows you to run privileged logic securely or apply mutations to your MongoDB database securely. If you don’t yet have a backend application, but would like to run your own backend environment, we have example implementations available (see below).
- Serverless cloud functions (hosted/managed): PowerSync offers serverless cloud functions hosted on the same infrastructure as PowerSync Cloud which can be used for the needed backend functionality. We provide a MongoDB-specific template for this which can be used as a turnkey solution.
Using Your Own Custom Backend API
This option gives you complete control over the backend. The simplest backend implementation is to simply apply mutations to MongoDB as they are received, which results in a last-write-wins conflict resolution strategy. See App Backend Setup and Writing Client Changes for more details. We have example backend implementations available (e.g. Node.js, Django, Rails, .NET). On the client-side, you need to wire up theuploadData() function in the “backend connector” to use your own backend API. The Client-Side Integration With Your Backend section of our docs provides more details on this.
Using PowerSync’s Serverless Cloud Functions
PowerSync provides serverless cloud functions for backend functionality, with a template available for MongoDB. See the step-by-step instructions on how to use the template. The template can be customized, or it can be used as-is. The template provides turnkey conflict resolution which roughly matches the built-in conflict resolution behavior provided by MongoDB Atlas Device Sync.PowerSync’s serverless cloud functions require a bit of “white glove” assistance from our team. If you want to use this option, please get in touch with us so we can get you set up.
3. Set Up Authentication Integration
For quick development and testing purposes, the Setup Guide from step 1 instructions you to generate a temporary development token to use for authentication. At some point you will need to replace the development tokens with proper JWT-based authentication integration. PowerSync supports various authentication providers including Supabase, Firebase Auth, Auth0, Clerk, and custom JWT implementations. The Authentication Setup section of our docs provides full details on this.Questions? Need help?
- Ask AI (see lower right corner of this site), which is trained on all our documentation, repositories and Discord discussions.
- Get in touch with us.